Waste disposal has become one challenge too many. Today, we have many litters in our immediate environment and considering that this is one major cause of carbon emissions, we need to do better.
It is better if our households will have effective waste disposal measures in place and with the intervention of the government, waste management would be easily managed in our society.
In light of that, a new solution has been developed. It is called smart dustbin. It is a global awareness campaign to reduce the proliferation of waste in our environment. Currently, different measures have been developed to ensure that this drive becomes a mainstay.
We are glad to note that a major move has been made in this regard. It is the building of a smart dustbin using Arduino. From the concept, this is an idealistic perspective to tackling the growing spates of waste pollution in our society.
Background to the Project
Smart dustbin using Arduino is a project built using the tools on the broader Arduino platform. For context, Arduino is an open-source hardware and software platform, which seeks to introduce well-formulated plans for the continued improvements in consumer electronics.
By this designation, the smart dustbin using Arduino project is designed to integrate technology to simplify how waste is collected and disposed.
The Contactless Design
The smart dustbin using Arduino project was launched during the Coronavirus pandemic era. Therefore, it complied with the best practices, one of which is to help reduce the spread of the virus. This is why a contactless approach was used.
This time, instead of approaching the dustbin, opening it with your hands and dropping your waste, the reverse is the case. The dustbin is called “smart” in the first place because of the ability to detect approaching movements and to open for the coming person to drop the waste – all these are done without lifting the lid.
The Overall Working Principle
Here is a detailed breakdown of all that goes into making the smart dustbin using Arduino what it is – a fully-self-sufficient dustbin that doesn’t necessarily human operation.
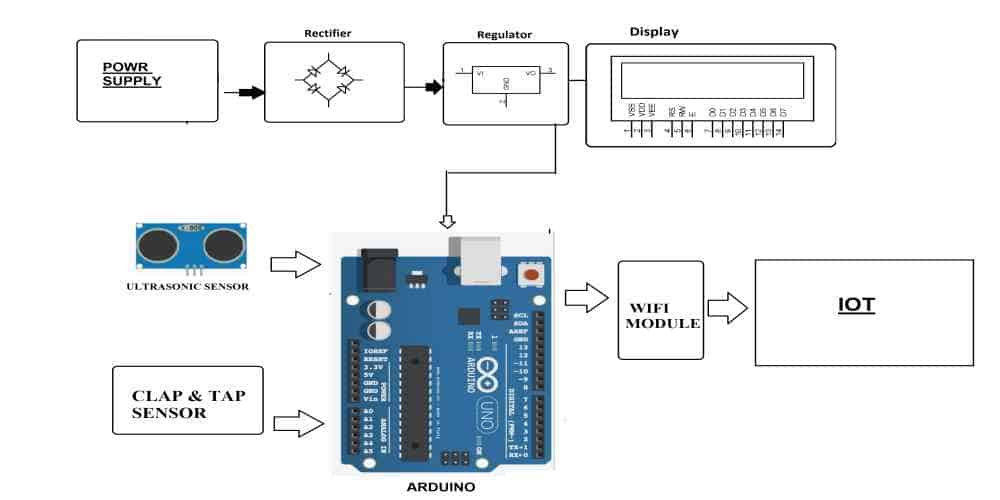
The Use of an Ultrasonic Sensor
The sensor is one of the core components used in manufacturing this dustbin. By default, an ultrasonic design is designed to transmit and detect sound waves. It does it in a way that once the ultrasonic waves hit an object or are obstructed from passing, the waves would return.
A similar model is used here and the core function of the ultrasonic sensor is to detect an incoming object (in this case, the person coming to drop a waste). Once this is detected, the sensor sends signals to the other component (the Arduino Uno). It is then the duty of the Arduino Uno to detect the signals and translate that into a recognizable command to enable the opening and closing of the smart dustbin.
Distance Calculation
One of the core working concepts of the ultrasonic sensor is to determine how far the ultrasonic waves were from an obstructive element or object. The distance helps in measuring the distance of the sound. It then uses that to measure how it performs,
For the smart dustbin using Arduino, the ultrasonic sensor works by measuring the distance between the person approaching and the location of the dustbin. With the instant calculation of the distance differences, the sensor now signals to the servo motor on the direction of the sound and for the motor to facilitate the dustbin’s opening in that direction.
The accurate measurement of the sensor helps to reduce the possibility of the smart dustbin from opening in a different direction than the approaching person. This way, the contactless design would still be maintained, as the person wouldn’t have to manually turn the dustbin in the right direction.
Opening the lid of the bin is one step. The next step is to ensure that the bin remains opened for a certain time before closing. Again, we are relying on the ultrasonic sensor’s calculation of the (approaching) sound wave. With this, it helps to determine the distance and how long it would likely take for the approaching person to drop the waste and go.
It is also possible to make adjustments to the smart dustbin using Arduino code. The default opening time could be anywhere between 3 seconds and 5 seconds. If you figured out that it would take longer than that for the waste to be dropped, you can make manual adjustments to the timing in the Arduino IDE.
Making Your First Smart Dustbin Using Arduino

Now that you have seen how important this project is, let us talk about how you can make one.
Before we start, you need to get the needed materials or hardware. The following is a list of the hardware or physical components needed to make smart dustbin using Arduino:
- Arduino Uno
- Jumper wires
- Ultrasonic sensor
- Servo motor
Here is a breakdown of how each of those components work:
1. Arduino UNO
This is the core or primary product or tool you can find on the Arduino open-source platform for building electronic projects. Without this, it would be practically impossible to start working on building your smart dustbin using Arduino.
Here is why it is relevant:
- Structure: the Arduino UNO comprises of two broad classifications, with one part being the Integrated Development Environment (IDE), which doubles as a piece of software. The IDE is primarily used to write and upload computer code to the physical board. The other classification of the Arduino UNO is the physical programmable circuit board, which doubles as the Microcontroller (MCU).
- Versatile Usage: whether you are looking to build the smart dustbin out of passion or for real-world usage, rest assured that the Arduino UNO platform supports all that. It is the ideal board and development environment for different kinds of persons, ranging from newbies/beginners, hobbyists, designers and artists. Basically, the beginner-friendly design endears it to everyone.
- Ease-of-Use: in addition to the versatile usage, the Arduino UNO is also easy to use. It uses the simplified version of the C++ programming language and by so doing, simplifies the learning process for the users.
What’s Inside Your Arduino UNO?
Now that we have understand how the Arduino UNO board and design environment works, let us talk about some of the components.
Here are some of the integral parts and how they work:
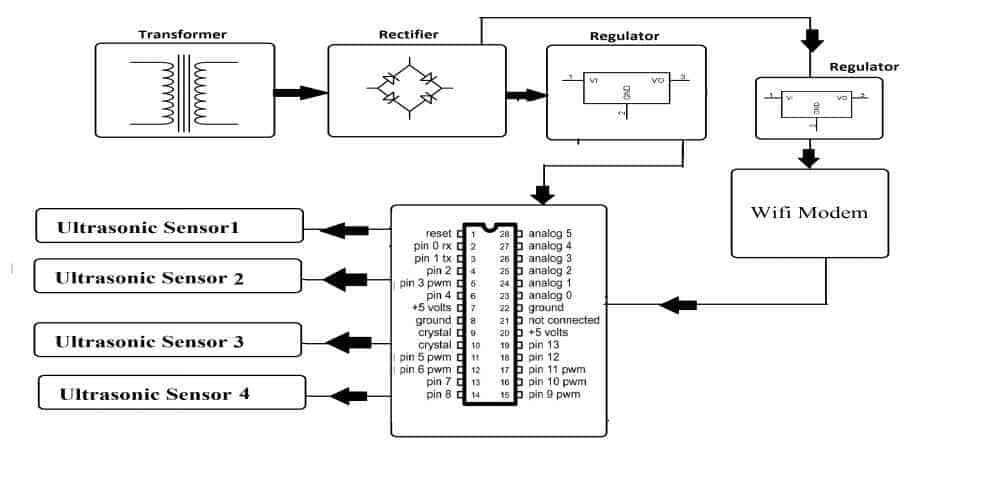
Pins
These pinouts are one of the components you need to make the right connections on the programmable physical board. The pins include but are not limited to AREF, 5V, Digital, Analog, 3.3V, PWM and GND.
Power LED Indicator
This is the indicator that lets you know when there is power supplied to the board. It typically turns on when the Arduino is plugged into a power source.
Power
There are two major ways to supply power to the Arduino UNO board. This can be done either by using a wall power supply, which is terminated in a barrel jack or by using a Universal Serial Bus (USB) cord connected to your computer.
The other components found on the Arduino UNO board are TX/RX LEDs, Voltage Regulator, Reset Button, and the Main Integrated Circuit (IC).
2. Ultrasonic Sensor
This is the second-most-important needed for the smart dustbin using Arduino’s construction. The best ultrasonic sensor to use for the design is the HC-SR04. The sensor uses SONAR to measure or determine the distance of the object (or the incoming person) from the sensor.
3. Jumper Wires
These are wires used for connecting different components on the Arduino UNO board. Depending on the specifications of the smart dustbin you want to build, you could need as much as 40 jumper wires.
4. Servo Motor
This is an electrical device, designed to aid the movement of the smart dustbin. You can be sure that with the right configuration, the servo motor would rotate or turn to different angles or directions.
You can start building your smart dustbin using Arduino using the SG-90 Servo Motor. In addition to being lightweight and fast, it is the best for small robotics projects, such as the smart dustbin.
Step-by-Step Process of Building a Smart Dustbin Using Arduino
We also need additional components for this project. The components we need are: cello tape, an actual dustbin, an ice-cream stick, paper cutter, cardboard, scissor and adhesive.
With our components readied, let us now talk about how to build the bin. Follow these steps:
- Make a lid-like shape out of the cardboard. Make sure it is the same shape as that of the actual dustbin you have there.
- Attach the HC-SR04 ultrasonic sensor at the front of the dustbin.
- Use the ice-cream stick to connect the SG-90 Servo Motor. Once this is done, attach the motor to the dustbin.
- Connect the Trig and the Echo pins to the Pins 5 and 6 on the Arduino UNO board.
- Connect the VCC pin to the 5V on the Arduino UNO board and both the grounds are connected together.
Conclusion
You also need to use the right program code to finalize the project. You can download the code with this link (https://drive.google.com/drive/folders/1xb4cyyzlHGZZU1tExqBZXpE0gnLfE72N). Once you have the code, all you have to do is to upload it to the Arduino UNO board and make a few tweaks to meet the desired performance of the smart dustbin.
Overall, the smart dustbin concept is designed to improve waste disposal, make our cities and immediate environments cleaner, while improving our lives due to cleaner atmospheric conditions.
