Assembling electronic parts can be a daunting task for beginners, but it can also be a rewarding experience. With the right tools and knowledge, anyone can learn how to assemble electronic parts. In this article, we will provide a step-by-step guide on how to assemble electronic parts and offer tips on how to avoid common mistakes.
Before you start assembling electronic parts, it is important to have a basic understanding of how electronics work. You should also have a clear idea of what you want to build and the components you will need. It is also essential to have the right tools, such as a soldering iron, wire cutters, and pliers. Once you have these basic requirements, you can start the assembly process.
The first step in assembling electronic parts is to read the instructions carefully. Make sure you understand all the steps before you start. It is also important to double-check that you have all the necessary components and tools. Once you have everything you need, you can start assembling the parts. Remember to work slowly and carefully, and don’t hesitate to ask for help if you need it.
Understanding Electronic Parts
Electronic parts are the building blocks of any electronic device. Understanding these parts is essential for anyone interested in assembling electronic devices. In this section, we will discuss some of the most commonly used electronic parts and their functions.
Resistors
Resistors are electronic components that resist the flow of electric current. They are used to control the amount of current that flows through a circuit. Resistors are usually color-coded to indicate their resistance value. They come in different shapes and sizes, but the most common type is the cylindrical shape.
Capacitors
Capacitors are electronic components that store electrical energy. They are used to smooth out voltage fluctuations in a circuit and filter out unwanted noise. Capacitors come in different types, including ceramic, electrolytic, and tantalum. The type of capacitor used depends on the application.
Diodes
Diodes are electronic components that allow current to flow in only one direction. They are used to protect circuits from reverse voltage and to convert AC voltage to DC voltage. Diodes come in different types, including rectifier diodes, Zener diodes, and Schottky diodes.
Transistors
Transistors are electronic components that amplify or switch electronic signals. They are used in a wide range of electronic devices, including radios, televisions, and computers. Transistors come in different types, including bipolar junction transistors (BJTs) and field-effect transistors (FETs).
Integrated Circuits
Integrated circuits (ICs) are electronic components that contain multiple electronic devices on a single chip. They are used in a wide range of electronic devices, including computers, smartphones, and televisions. ICs come in different types, including microprocessors, memory chips, and digital signal processors.
In conclusion, understanding electronic parts is essential for anyone interested in assembling electronic devices. The parts discussed in this section are just a few of the many electronic components used in electronic devices. By understanding these parts and their functions, you can build and repair electronic devices with confidence.
Tools and Equipment for Assembling Electronic Parts

Assembling electronic parts requires specific tools and equipment to ensure that the process is done correctly. Here are some of the essential tools and equipment you will need for assembling electronic parts.
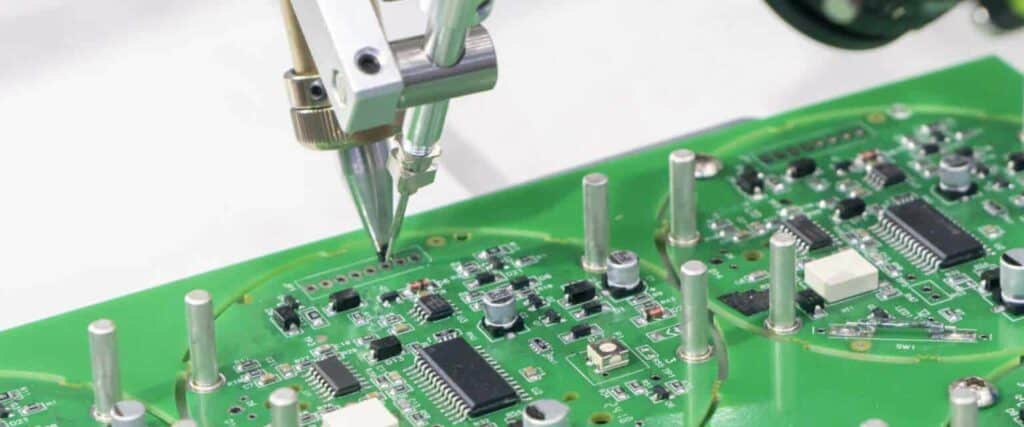
Soldering Iron
A soldering iron is a tool used to melt solder, which is a metal alloy used to join two metal surfaces together. It is an essential tool for assembling electronic parts. When choosing a soldering iron, look for one with a temperature control feature to ensure that you can adjust the heat according to the type of solder you are using.
Wire Cutters and Strippers
Wire cutters and strippers are used to cut and strip the insulation from wires. They are essential tools for assembling electronic parts because they allow you to create clean and precise wire connections.
Multimeter
A multimeter is a tool used to measure electrical current, voltage, and resistance. It is an essential tool for assembling electronic parts because it allows you to test the connections and ensure that everything is working correctly.
Tweezers
Tweezers are used to handle small electronic components. They are essential tools for assembling electronic parts because they allow you to handle small components without damaging them.
Soldering Station
A soldering station is a tool used to hold the soldering iron and keep it at a specific temperature. It is an essential tool for assembling electronic parts because it ensures that the soldering iron is always at the right temperature.
Third Hand
A third hand is a tool used to hold small electronic components in place while you solder them. It is an essential tool for assembling electronic parts because it allows you to hold the components steady while you work on them.
In conclusion, assembling electronic parts requires specific tools and equipment to ensure that the process is done correctly. The tools and equipment listed above are essential for assembling electronic parts, and having them on hand will make the process much easier and more efficient.
Steps for Assembling Electronic Parts
Assembling electronic parts can be a daunting task, but with proper guidance, it can be a breeze. Here are the steps you need to follow to ensure a successful assembly process:
-
Gather the necessary tools and materials – Before you start assembling, make sure you have all the tools and materials required for the job. This may include a soldering iron, wire cutters, pliers, a multimeter, and the electronic parts themselves.
-
Identify the components and their positions – Take a good look at the components and identify their positions on the circuit board. This will help you avoid any mistakes during the assembly process.
-
Solder the components – Using a soldering iron, attach the components to the circuit board. Make sure you apply the right amount of heat and solder to avoid damaging the components or the board.
-
Test the connections – After soldering the components, use a multimeter to test the connections and ensure they are properly connected. This will help you avoid any issues with the circuit board later on.
-
Clean up the board – Once you’re done with the assembly process, clean up the board and ensure there are no loose wires or solder that can cause any issues.
By following these steps, you can assemble electronic parts with ease and ensure a successful outcome. Remember to take your time and be patient throughout the process to avoid any mistakes or issues.
Testing and Troubleshooting Electronic Parts
Testing and troubleshooting electronic parts is a crucial step in the assembly process. Even the smallest mistake can lead to a malfunctioning device. In this section, we will discuss some basic techniques for testing and troubleshooting electronic parts.
One of the most common tools for testing electronic parts is a multimeter. A multimeter is a device that measures electrical properties such as voltage, current, and resistance. By using a multimeter, you can test whether a component is working properly or not.
Before testing a component, it is important to identify its pins or terminals. You can find this information in the component’s datasheet. Once you have identified the pins, you can use the multimeter to measure the resistance between them. If the resistance is within the expected range, the component is most likely working properly. If the resistance is too high or too low, the component may be faulty.
Another technique for testing electronic parts is using a signal generator and an oscilloscope. A signal generator produces a specific waveform, and an oscilloscope displays the waveform. By connecting the component to the signal generator and oscilloscope, you can test whether the component is responding to the signal properly.
When troubleshooting electronic parts, it is important to start with the simplest components and work your way up. For example, if a device is not turning on, check the power source and the power switch first. If those components are working properly, move on to more complex components such as the microcontroller or the sensors.
In conclusion, testing and troubleshooting electronic parts is a critical step in the assembly process. By using tools such as a multimeter, signal generator, and oscilloscope, you can ensure that each component is working properly. When troubleshooting, start with the simplest components and work your way up to more complex components.
