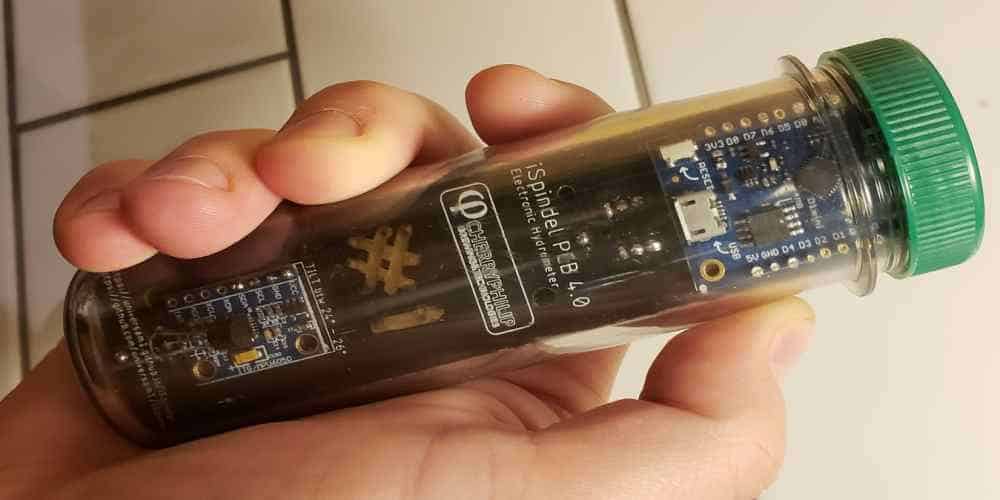
The ISPindel PCB is a device that is used to measure the specific gravity and temperature of a liquid. It is a small, open-source project that can be built by hobbyists and homebrewers. The name “ISPindel” comes from the German word for “spindle,” as the device resembles a spindle that can be placed in a liquid to measure its properties.
The ISPindel PCB consists of a microcontroller, accelerometer, temperature sensor, and a battery. The microcontroller has specific programming to read data from the accelerometer and temperature sensor and use that information to calculate the specific gravity and temperature of the liquid. The data transmission process starts where it wirelessly transmits to a smartphone or computer using Wi-Fi or Bluetooth.
The open-source nature of the ISPindel PCB means that the design and code are freely available for modification and improvement. Hobbyists and homebrewers can customize the device to fit their specific needs and share their modifications with the community.
Common Uses of ISPindel PCB
The ISPindel PCB provides accurate measurements of specific gravity and temperature and has a wide range of applications in various industries, particularly in brewing and fermentation. The device consists of a microcontroller, accelerometer, temperature sensor, and battery, all working together to enable real-time data acquisition.
Homebrewers and professional brewers widely use the ISPindel PCB during the brewing process to monitor the progress of fermentation. Placed in the fermenting wort, the device constantly measures the specific gravity and temperature, allowing brewers to make informed decisions on when to bottle or keg the beer.
Beyond beer, the ISPindel PCB has other uses in the winemaking process. Winemakers can use the device to monitor fermentation progress and determine the ideal time for bottling or aging. The device is also useful in the production of other fermented beverages, such as kombucha or mead. Its customizable and open-source design allows hobbyists and professionals to modify and improve the device to fit their specific needs.
The Process of Building an ISPindel PCB from Scratch
While there are pre-built models available for purchase, building an ISPindel PCB from scratch can be a rewarding and educational experience for hobbyists and professionals alike. In this section, we will walk through the process of building an ISPindel PCB, including the required materials and programming steps.
Materials Required
To build an ISPindel PCB from scratch, you’ll be needing the following materials.
PCB Board: A printed circuit board is the foundation of the ISPindel PCB. It is recommended to use a double-sided PCB board to accommodate all the necessary components.
Microcontroller: The microcontroller is the brain of the ISPindel PCB. The best and the most acceptable microcontroller for the ISPindel PCB is the ESP8266, which is a powerful and low-cost chip that can connect to Wi-Fi networks.
Accelerometer: The accelerometer measures the angle of the device and helps in calculating specific gravity. The most common accelerometer for the ISPindel PCB is the MPU-6050, which is a low-cost and reliable chip.
Temperature Sensor: The temperature sensor measures the temperature of the liquid and is helpful to provide accurate temperature readings during fermentation. The most common temperature sensor for the ISPindel PCB is the DS18B20, which is a waterproof and high-accuracy chip.
Battery: The battery provides power to the ISPindel PCB. A rechargeable lithium-ion battery is an excellent choice for its long lifespan and stability.
Miscellaneous Components: Resistors, capacitors, diodes, and other components assist to build the ISPindel PCB. You can purchase these components in a kit or individually.
Programming Steps
Once all of the necessary materials have been acquired, the next step is to program the microcontroller. The following steps are helpful to program the microcontroller:
- Install the Arduino Integrated Development Environment (IDE): The Arduino IDE is an open-source software which assists with the programing of microcontrollers. You can download it from the Arduino website and install it on a computer.
- Connect the ISPindel PCB to the computer: Connect The ISPindel PCB to the computer using a USB-to-serial adapter or through Wi-Fi.
- Install the necessary libraries: The ISPindel PCB requires several libraries to run correctly. Download and install these libraries through the Arduino IDE.
- Upload the code: The code for the ISPindel PCB can be found on various online forums and websites. Once you have downloaded the code, upload it to the microcontroller using the Arduino IDE.
- Calibrate the ISPindel PCB: Calibration ensures accurate readings of specific gravity and temperature. You can perform calibration using a pre-built solution of known specific gravity.
Tips and Precautions

· Safety First
Always wear appropriate personal protective equipment (PPE) such as safety glasses, gloves, and an anti-static wrist strap while building PCBs. This will protect you from any accidents that may occur.
· Soldering Equipment
Make sure you have all the necessary soldering equipment, including a soldering iron, solder wire, desoldering pump, and soldering stand. Ensure that you have well-tuned your soldering iron and doesn’t generate excessive heat that may damage the components.
· PCB Layout
Make sure you follow the PCB layout diagram correctly and double-check the connections before soldering. Always refer to the datasheet of the components you are using and make sure they are placed correctly and in the right orientation.
· Programming
Programming the ISPindel requires you to use a programmer and the required software. Make sure you have a compatible programmer and install the necessary drivers and software before attempting to program the device.
· Power supply
Make sure you have a stable and adequate power supply before powering up your circuit board. Avoid connecting your ISPindel PCB to an unregulated power source as this may damage the board.
· Test and Verify
Always test your circuit board after assembly to make sure it’s working as expected. Check the output of the device with an oscilloscope or a multimeter to ensure that it’s within the expected range.
Conclusion
By following the steps outlined in this article, anyone can build their own ISPindel PCB and customize it to fit their specific needs and preferences. Additionally, the ISPindel PCB is a powerful device that provides accurate and real-time measurements of specific gravity and temperature. As a result, it is an essential tool for anyone involved in brewing and fermentation. With its open-source design and customizable features, the ISPindel PCB is sure to have a positive impact on the brewing and fermentation industry for years to come.
