Do you want to learn about PCB solders? There is often some trouble getting into the subject, especially when there is no prior knowledge. We’re mainly focused on explaining what soldering is.
This should help you get more information in-depth after this or a useful refresher if you already know soldering but need more basic knowledge. In this article, we’ll cover the fundamentals of soldering, including what it is, the different types of soldering, and how to begin working with printed circuit boards (PCBs).
Introduction
Solder is the fundamental skill to get into electronic engineering. They’re all like peas and are stuffed with carrots. And although you can learn about electronics without buying a cheap metal sander, you’ll quickly find that the possibilities are huge.
We believe soldering can be an essential skill for anyone. As technology evolves, we believe that it is important to learn how to make a difference not only through technology but also through building tools to improve the environment.
If you want to learn more about soldering, we hope this serves as a great introduction, and if you already know a bit about it but want to brush up on the basics, we hope this serves as a great refresher.
What Is Soldering?
Soldering is the process of putting together two or more pieces of metal using a molten metal known as solder, which has a lower melting temperature than the other types of metal. This procedure is the most common one used in the electronics industry and is an essential step in the process of putting together various electrical components.
Soldering is utilized in a wide variety of industries, including the construction of printed circuit boards (PCBs), the creation of jewelry, the connecting of pipes, and plumbing. A soldering iron or gun heated to a temperature of less than 840 degrees Fahrenheit, together with solder, is required for the soldering process.
A solder has the appearance of a thin wire or tube most of the time. A substance known as flux, which is acidic in nature and inhibits oxidation, may be found inside the tube. A solder can come in a variety of forms, but in general, it is a low-melting-point metal alloy that often consists of lead or tin mixed with brass or silver.
When this metal is melted by the soldering iron, it is then employed in a manner similar to that of glue to adhere the parts together. After the solder metal has had time to cool and reharden, it will take the form of a single big shape that bridges the gap between the two components.
There are now various lead-free variants of solder available to choose from in an effort to cut down on the amount of lead used owing to safety and environmental concerns. Brass, copper, tin, and silver are some common examples of these alternatives.
Lead-free solder has a greater melting point than regular solder. Lead-free solder also has the potential to be less effective. A soldering project is one that requires not too much solder but just the right amount of precision and focus.
What Is a Soldering Iron?
A soldering iron can have the appearance of either a pen or a gun, and, when heated to an extremely high temperature, the solder melts and allows you to use it to connect two components together, after which the solder cools.
It goes without saying that electricity is required for the operation of a soldering iron. However, butane soldering irons are also available for enhanced mobility. Although electric ones are the most frequent, butane soldering irons are also accessible.
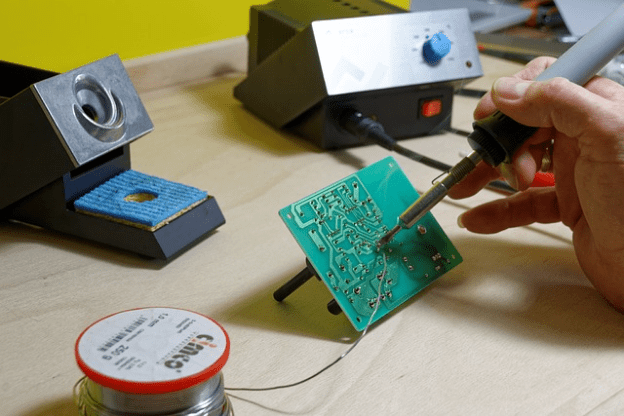
First, heat is transferred to the PCB board using an iron that is placed on a soldering iron stand. After this step, the solder is used to connect the two metals. Even while the form of a pen is typically the most user-friendly, being proficient with any soldering iron requires a certain level of experience, as well as practice and expertise.
What Is PCB Soldering?
Soldering, particularly of printed circuit boards (PCBs), is a term that is occasionally used. Since it is one of the most fundamental skills, soldering needs to be learned by anyone who wants to work with electronics and electrical circuits.
The soldering process may be done in a variety of ways. nevertheless, the fundamental explanation of the soldering process is that it joins together two very small components on the surface of the PCB (printed circuit board).
This explanation is accurate even though there are a variety of different ways that the soldering process can be completed. Soldering, in other terms, is a process of combining two or more different electrical components that are already present on your circuit board.
The actual activity of soldering is not particularly complicated, yet it is at the heart of the operation. A soldering iron, some solder, solder wires, and of course the mostly metal components that you will be soldering together are all that is required to successfully execute even the most basic soldering task.
A soldering iron is a tool that has the appearance of a pen and may get quite hot. It is used to connect two pieces of metal together by melting solder and utilizing the molten metal to do so. Solder can come in a variety of forms, but in general, it is a low-melting-point metal alloy that often consists of lead or tin mixed with brass or silver.
When this metal is heated by the soldering iron, it is then employed in a manner similar to that of glue to adhere the parts together. After the solder metal has had time to cool and reharden, it will take the form of a single big shape that bridges the gap between the two components.
Different Soldering Techniques You Should Know
There are a few different approaches to soldering a PCB, but these soldering techniques can essentially be split up into two distinct methods that are known as hard soldering and soft soldering. Now, let’s examine these two distinct methods that are available.
Soft Soldering
The procedure of soft soldering is used to join smaller components to bigger printed circuit boards (PCBs). In addition to that, it is the most typical method of soldering. These minute components will typically have a low temperature at which they will begin to liquefy, which will cause them to begin disintegrating when subjected to the high temperatures of the heat source.
In order to properly connect the component to the board, however, there is a further step that must be taken in addition to melting the component. In this particular instance, the additional step in question is a filler metal, which is commonly an alloy consisting of tin and lead.
The requirement that this alloy must have a melting temperature that is higher than 752 degrees Fahrenheit is by far the most essential aspect of the material. During the process of soldering, the utilization of this alloy is essential since it serves as a binding agent between the component and the board, so ensuring that the two remain firmly attached to one another.
In order to provide the required amount of heat for this job, a gas torch is typically employed. This causes the alloy to deteriorate, which in turn fuses the component to the circuit board.
Hard Soldering
Hard soldering is a method that employs a solid solder to connect two different metal elements together. This is accomplished by the solder spreading throughout the holes of the components, which are able to become unlocked when they are subjected to high temperatures. This process results in a stronger bond.
Hard soldering is a procedure that is comprised of two smaller sub-processes that are called respectively as silver soldering and brazing. As its name indicates, silver soldering involves using a space-filling metal that is an alloy of silver and cadmium. Specifically, cadmium-silver.
This technique is utilized for the manufacturing of tiny components as well as the performance of specific types of maintenance on circuit boards. Silver is utilized in this technique because it gives a free-running personality, even though on its own, silver is not normally an appropriate choice for space filling.
This is because silver offers a free-running individuality. Because of this, various fluxes are often utilized if one wishes to produce dependable silver soldering. The term “brazing” refers to a method of soldering that uses a liquid filler metal to connect two terminals composed of base metals.
This filler travels through the joints of the board due to the attraction of a vessel, and once it has cooled down, it produces a union via atomic magnetism and diffusion. As a consequence, a sturdy joint has been produced, which links the two distinct terminals. In the process of brazing, the filler substance that is generally employed is brass.
Necessary Soldering Accessories You Need
The particular nature of your plans will determine the type of solder that is appropriate for electronics as well as the specific equipment that you will want for a project that involves soldering.
However, the following is a list of the necessities that you will almost certainly require, regardless of what it is that you are soldering:
Soldering Several
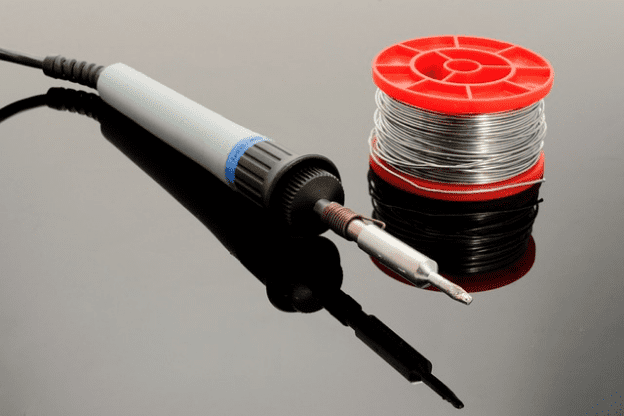
To melt solder, you need a system to conduct heat, which transfers heat to necessary electronic components and a soldering iron of course. These instruments include a number of separate pieces that come together to make a pencil-like instrument that is pleasant to hold and operate.
Although most soldering irons are on the compact side, bigger solder guns are also on the market. In industries like jewelry production, where precision and heat control are paramount, soldering guns of this type are commonly utilized.
Faster cooling is just one more advantage of soldering guns. All soldering irons, no matter how big or little, are made up of the same basic parts. Each of these parts is as follows:
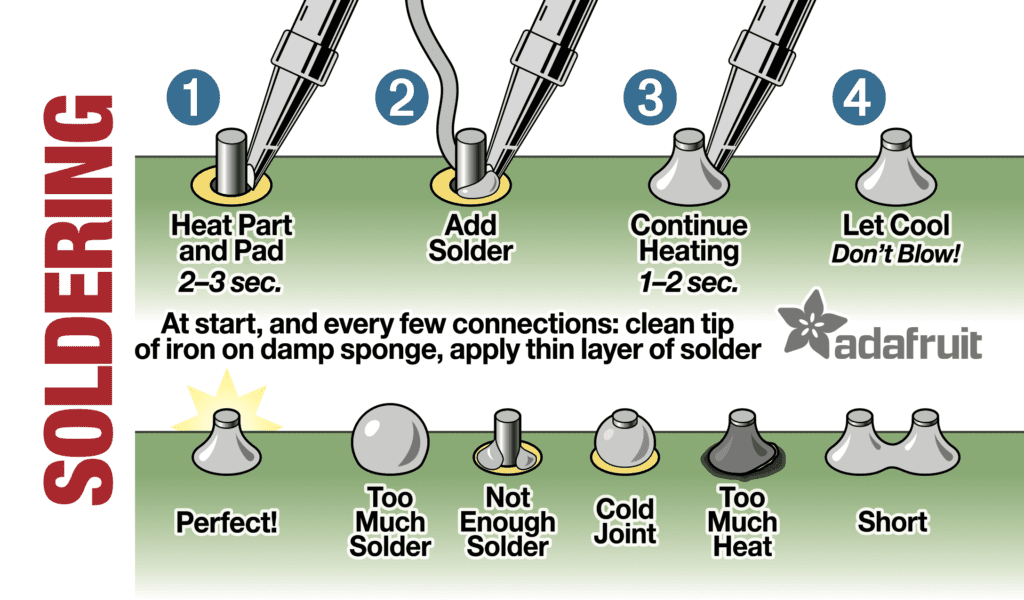
TIP
Think of this as the tip of the pencil or the section of the soldering iron that will come into contact with the solder. The tip of the iron is where the tool gets hot, and it’s where you’ll be doing most of your solder melting and shaping.
Copper forms the base of the soldering iron tip, which is then covered in a metal surface of the iron. Maintaining a spotless tip is absolutely necessary for successful soldering.

Prior to beginning the process of soldering, you can use a sponge to clean the solder tip. Additionally, tips are interchangeable and are designed to be changed depending on the kind of project that you are currently working on.
WAND
This is the section of the wand that you’ll be holding onto when using the iron. A cushioned handle on the wand protects your hand from the hot iron and gives you something to grip securely.
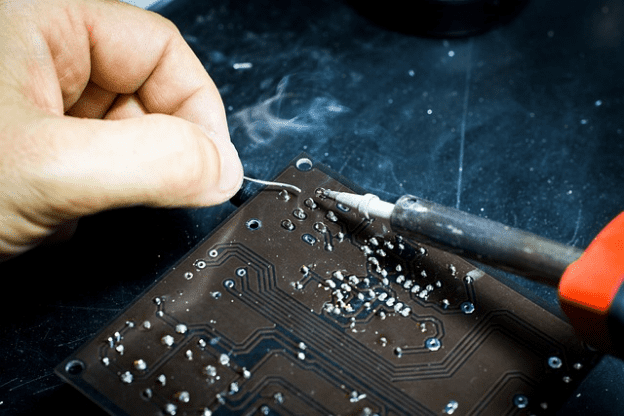
SOLDER WICK
To better understand the solder wick, imagine the tip of your soldering iron to be the lead in a pencil and the solder wick to be the eraser. Braided copper wire forms the solder wick, which is then utilized to soak up excess solder. Additionally, solder suckers can be used to get rid of any surplus solder.
REST
Even though it’s not technically a component of the iron itself, the rest is a must-have accessory that allows you to set the iron down and free up your hands. If you place the iron down straight on your table, counter, or workspace, this pad will protect it from heat. Consider the soldering iron’s dimensions, wattage, temperature range, and voltage while shopping for one.
Flux for Soldering
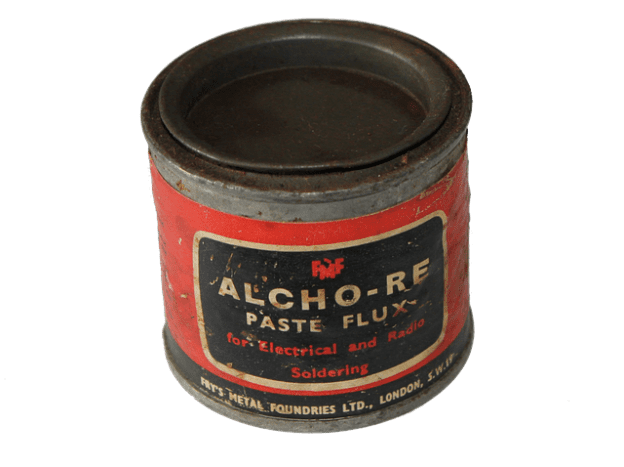
As a purifier, solder flux helps make things shiny and new again. When it comes to soldering, flux performs three separate tasks concurrently, making it a vital item to have on hand for every job.
First, it eliminates any corrosion from the parts you’ll be soldering. It also seals up any gaps where air may enter, further protecting the material from rust. Last but not least, it makes the solder drip with a more distinct personality.
Soldering should be done in a well-ventilated environment since the smell of solder flux can be strong and unpleasant. It is also important to note that excess flux residue can cause problems, so it is only wise that you be watchful of flux residue.
Soldering Paste
A solder paste appears like a gray putty-like substance. You’ll use this solder paste to bind the different leads of chip packages to connecting ends of a PCB.
Soldering to Circuit Board
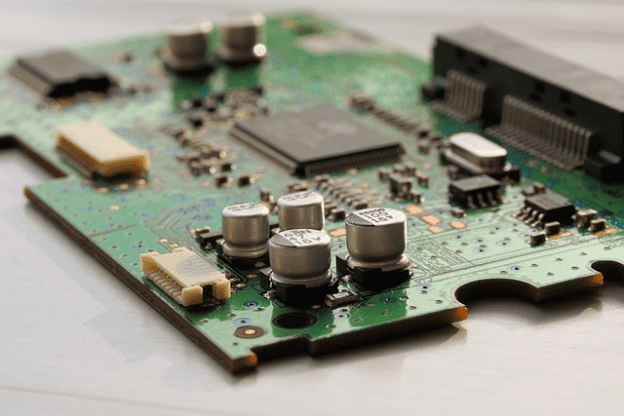
The PCB is your circuit board. Every single PCB soldering process you’ll perform will take place on the PCB surface when you use your soldering tools to connect different components and terminals to one another and to the board.
PCB Soldering: Common PCB Soldering Problems to Avoid
Soldering components onto a printed circuit board (PCB) is a crucial step in building any PCB. Getting high-quality PCB goods might be difficult due to the various challenges that can arise throughout the soldering process.
Since PCB components are getting smaller and more compact, soldering problems are more likely to develop. What, though, are these PCB soldering issues? What’s more pressing is figuring out how to keep from encountering these roadblocks in the first place. Let’s now talk about the most common soldering PCB board issues and how to avoid them.
Solder Bridging Bad Solder Joints
Soldering is the most difficult aspect of PCB assembly. Unknowingly connecting a joint is the source of the issue. The connections occur most often through excessive solders between bones.
The identification of solder bridges is often difficult, given their microscopic dimensions. This could become quite an issue if the soldering of components causes short-circuiting or causes the components to burn up and burn off.
Tell us a good way to deal with it. Immediately after you have identified the bridge, place a soldering iron on the top to melt the solder. Draw out the board. In the event of the bridge requiring more solder, remove all of that solder with the solder sucker and reattach.
Excessive Soldering
When removing solder on pins it creates excess buildup. Many beginners assume the more solders they ask the better. Nevertheless, it’s incredibly hard to understand how things are going to be on the surface when you have a lot of welding.
Excess soldering in pins can hinder correct wetness. In addition, if solder is used too often, it can lead to solder bridges. When avoiding these problems, apply enough solder so you can properly wet the pins or pads. Remove components from soldered PCBs.
Solder Balling
Other common soldering defects in PCB boards are solder balls. It usually occurs when a reflow solder is used. Problems include small pieces of solder adhering to laminate and conductor surfaces. A number of problems can be caused by using proper PCB soldering methods to reduce the risk of failure. Soldering on PCBs fixes faulty ballings.
Cold Joints
You may have seen your good solder joint as dull or lumpy before. It is caused by the high heat of the PCBs soldering on the bones and therefore the joint won’t melt. Why are joints not heated? I think it is possible there are various causes. Maybe your heat did not get enough for melting the soldering iron.
Many defects occur due to incorrect construction of traces and pads on the pads. Cold joints must quickly be reconstructed because otherwise cracked components will develop and eventually fail the whole product. visual inspection of PCBs to find faults before the solders.
Overheated Joints
These are different from cold joints. The problem can arise when your PCB solder temperature is too high in the solder iron and it almost reaches its melting point. Sometimes, problems occur with solders or they may occur due to faulty pad surface characteristics.
The welder may be ineffective in the absence of lead oxide which prevents heat transfer. In addition to these causes, you can heat joints too long and cause severe damage. Even if the cost is minimal, a pad may lift and require costly replacement. It’s important that you choose the ideal soldering temperature. Keep dirty parts clean with fluid.
Tombstoning
The solder should be attached to a pad and then started to wet. Occasionally, though, one pad does not finish wetting and leads to slanting the component. These tilts look like tombstones, hence their name.
If a solder pad is pushed into a melted state then it will result in tombstoning in reflow solder. Examples include the lack of relief design and cases in which the links on the pads have an undifferentiated thickness. The tombstone occurs when the inflow of a solder wave firmly swivels the component’s body.
Insufficient Wetting
During the dry time, joints become stiff. They don’t have enough communication to be heard by the board. So troops need to achieve 100 percent wetness with both the pins and pads. Neither gap nor space is necessary. Unfortunately, sometimes wetness doesn’t occur.
There are many causes. In other words, an engineer cannot use sufficient energy in his pen/pad. Other reasons for this issue are the lack of sufficient time to allow the solder to flow. Possibly there are dirty boards too. How could one avoid such a problem? You have to clean it thoroughly. Ensure there are equal solder temperatures for the pins and pad.
Solder Skips
Solder skips are solder joints where there is no water on the solder. The defects result from welding slipping over a pad and opening a closed loop. Often soldered skips are caused by the use of slips while design or manufacture is undergoing.
Possibly designers had a slightly different pad width. In other circumstances, the manufacturer opted not to use the wrong wave height to connect the soldering wave and the boards’ surface area to the solders. The surface mounting device is on board. The pad must be placed before PCB soldered.
Lifted Pads
Typically raised pads are pads separated from PC boards. Causes could be excess heat or pressure at the joint where a piece was soldered. The pads are difficult because they are fragile. It is very easy to remove them with this product. Once your problem is identified, please try to attach the pad to the boards before soldering. Soldered PCBs are soldered. Check the pad position before the soldered part.
Pin Holes and Blow Holes
Pinholes and blowholes can often be recognized because of their holes in soldered parts. A hole in a wall is not an open hole. This is usually caused during wave soldering. The humidity that exists at the hole is typically heated by a soldering process and is released through the molten solder creating gaps and causing voids.
How could this be prevented? Through hole soldering, You can also choose copper plating which is 25 mm thick on the holes. The corresponding pinhole or blowhole may occur during PCB soldery.
Solder Flags
Solder flag shows a reduced flux application or problem with solder drainage. This happens by removing the soldered part from the Wave soldering machine. One of the causes of this is a non-standard flux application, Hence you will notice welded residues that look like whiskers. Solder flags on the PCB indicate less flow applications.
