If you love to code and control hardware, you must be aware of the Arduino tool. And perhaps we assume that you’re here to brush up on your knowledge of Arduino projects. That’s why we’ve compiled a list of 10 easy and simple Arduino projects for beginners.
With the following projects, you can jump into coding in no time to get a taste of the hardware and boost your resume.
10 Easy and Simple Arduino Projects
To ensure you start on the right foot, we’ll discuss different Arduino projects and why Arduino is useful and easy for a beginner. So, let’s start learning some fascinating, enjoyable, and simple Arduino projects instead of more complex projects.
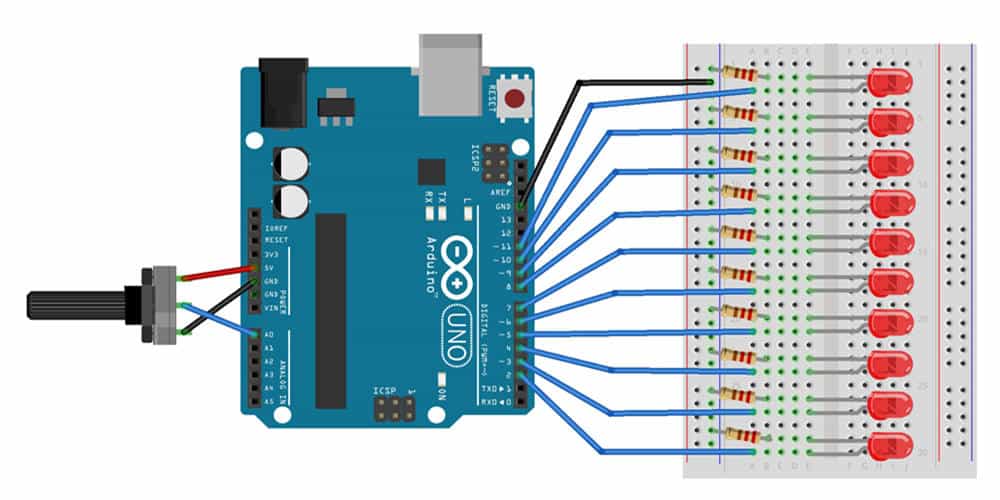
1- The Knight Rider
The Knight Rider is one of the simple Arduino projects for beginners on our list. It is nothing but a series of LED lights blinking sequentially. And it is one of the simplest Arduino projects on the list. However, before beginning, you have to grab the following things:
- Arduino Display Board
- Ten LED lamps
- Breadboard
- Ten 200 or 220-ohm resistors
With this Arduino project for beginners, you will learn about using LEDs for loops, enabling you to move on to more difficult projects. One little tip about this project is always to use resistors to avoid damaging your LEDs and Arduino Uno board. Even though everything can function without a resistor, it’s not worth putting your platform in danger.
To make the board, put on the LEDs’ negative legs in the breadboard’s negative bar. Then insert the positive board after taking the positive leg. Connect the resistors to the circuit board and the LED using a jumping wire. Do the same with the remaining LEDs
You must upload a program when everything is in place, and your Knight Rider will be operational.
2- Pong
After fully controlling LED lights, it’s time to begin the real show. How about creating an easy-to-play video game instead of finding various exciting ways to create something exciting? Sounds fun, right?
Another easy and simple Arduino project for beginners, Pong has long been a favorite among programmers. With Pong, it’s a great opportunity to showcase your abilities and pick up new ones without requiring too much technical magic on the backend.
Moreover, beginners will enjoy this project since it allows you to demonstrate your abilities and gain experience that you might use to develop bigger and better concepts. And the best part is that you can keep playing games till you’re satisfied.
For this project, you’ll need
- One push-button switch
- Arduino display board
- RCA plug
- Two 10k Ohm potentiometers
- 1k and 10k ohm resistor
- 470-ohm resistor
Before beginning, you must know that your RCA cable will work with the television set for this project. Therefore, check the RCA cable compatibility before purchasing. Despite the widespread adoption of HDMI in recent years, not all TVs will provide this input. Keeping this in mind, feel free to include audio, but remember that visuals are where the magic happens.
3- Ultrasonic Distance Sensors

With this project, you’ll use the well-known HC-SR04 ultrasonic sensor to enable your robot to move around and avoid obstacles. When you’re finished, you’ll have a gadget that can gauge distance and show it on a screen.
For this project, you’ll need
- Arduino board
- I2C converter and LCD
- Ultrasonic sensor HC-SR04
- Leapfrog wires
To start this project, first, you need to fix all the connections using jumper wires. However, you shouldn’t add your LCD at this point. Take an LCD now and attach it appropriately. Use the Arduino programming IDE to get the library.
After this, select LCD 12C under sketch> include library> manage libraries. With this, you’re done with our project. The ultrasonic distance sensor will teach you the skills needed to construct complicated robots in a very short amount of time.
When connecting an LCD to an Arduino board, it’s advised that you use one that has an integrated I2C converter, as this will reduce the number of cords you need to connect the two. The first loop is for setting up the LEDs, while the second is for controlling the lights. Modifying a single value in the program’s source code can alter its sensitivity.
4- Alarm System with Motion Detection
It may seem too difficult for amateurs to construct something using motion sensors, but the physics in this project is quite straightforward. This is the prime illustration of how straightforward and simple Arduino projects for beginners can act as a framework for more intricate systems.
You can use the motion sensor detection technology for various purposes if something blocks a certain infrared signal that the signal requires.
Alarms are only the beginning; you can even attach motion sensors technology to add style and functionality to various tools and systems. Imagine being able to operate your electronics by waving your hand! Quite cool!
For this project, you’ll need
- Arduino Uno display board
- Ping sensor
- LED strip light
- A buzzer
However, without notifying, it should be clear by this point that each project requires components like connections and resistors. In this scenario, the capability of motion detection is added to a standard LED connection by using additional components.
5- Asynchronous LEDs Blink
With this extremely easy project, you can learn the fundamentals of using an asynchronous set for flashing LEDs. For this project, you’ll need
- Arduino boards
- Jumper wires with 200 resistors
- 6 LED lights
- Push buttons
This project uses Arduino’s most fundamental components. The hardware component in this project is the most crucial. The longer LED leg should be connected to the positive pin, while the shorter leg should be connected to the negative pin. After that, connect the breadboard with the shorter leg, and the longer leg plugged into resistors. And as stated above, when working with LEDs, you should always use resistors to save your project from danger.
6- Traffic Light Controller Using Arduino
It’s crucial to comprehend every component of Arduino when you first start using it. In most cases, you’ll need a breadboard (the part with all the holes), LED lights, and a controller to put it together.
You’ll also need to pick up some coding skills. You should start with something simply because it can be the most difficult component of Arduino. Because it allows you to use every system offered by Arduino and learn about them without getting overly sophisticated or technical, this traffic light controller project is ideal.
Simply put, if you’ve mastered building something, you can advance to more difficult projects that will stretch your abilities and creative expression. For this project, you’ll need
- Yellow, red, and green LED lights
- Arduino Uno board
- A breadboard
- Six 220 connectors
- Push button switch
- Connecting wires
- 10k resistor
At this point, you must be considering additional money to purchase these supplies. Then fret not; you don’t have to go out and buy anything else, as these products already include an Arduino setup.
7- Digital Thermometer

Again, you most likely already have a thermostat or a mercury thermometer in your house that can provide readings without the need to construct something from the start. But measuring temperature with your digital thermometer is quite fascinating.
Nevertheless, there is something incredibly gratifying about designing a temperature measuring tool that can be evaluated so quickly and produce such significant outcomes. If you can master this task, you’ll be well-positioned to tackle much larger systems.
For this, you’ll need
- An Arduino Uno board
- Breadboard
- An LM35 temperature sensor
- A 10K potentiometer
- 19 jumpers for connections
The construction of a thermometer will accustom you to the wide array of Arduino components. You may integrate the various sensors into other systems to create a more useful device if you become proficient with the various sensors.
Imagine, for instance, that you could connect a fan to a thermometer, and the fan would activate when the temperature sensor reached a certain point. That’s why building your thermometer that measures temperature with a sensor and Arduino projects for beginners is quite useful.
8- Rainfall Detector
One of the best Arduino projects for beginners is a rainfall detector. You will be alerted to the beginning of the rain by the detector’s beeping. What you will need for this project is:
- Arduino Rain sensor Buzzer board
- leapfrog wires
The rain sensor is a PCB board with certain opening traces that allow water to enter the circuit. You can hear the unique circuitry’s signal to the digital output port. You may also read the sensor’s values using the analog output pin.
The board’s potentiometer lets you adjust the digital output’s threshold to your liking. When rain is detected, red LED lights will let you know, and you should contact the sensor with your palm or squeeze it slightly to see the light. Both the light and the skin resistance are high.
You can use your rain sensor by placing it outside and keeping other components inside to keep them dry. However, the beeping will begin as soon as raindrops begin to fall.
9- Stepper Motors
A motor that can rotate precisely and incrementally is referred to as a stepper. They can be found in CNC machines, 3D printers, and robots. You don’t need some of them as a beginner because they can be expensive and might turn into one of the most complex projects. The cheapest available stepper motor should be used for this task. Also, you can find cheap motors online.
For this project, you’ll need
- 28byj-48 stepper
- Arduino Uno board
- Jumper wires
This simple project is quite straightforward; you only need to connect the jumper wires to the board. And then connect the motor and the driver, and voila! You’re done. In order to verify if your head is turning, you can also place a piece of tape on it.
10- Arduino 7 Segmental Display
This simple project will teach you how to utilize and connect a display. Learning the fundamentals in this project will be highly beneficial because displays are essential component of Arduino projects.
- Leapfrog wires
- 7-section Arduino display board
- Three 300-ohm resistors
- Breadboard
The breadboard and male-male cables are among the simplest ways to attach a display to an Arduino board. Later on you can plug resistors. however, chances are it might get difficult for novices.
Also, resistors are required to protect the Arduino board from burning when connecting an LED. Since your display is made of LEDs, you must attach resistors to it.
Why is Arduino Useful?
Arduino is a popular microcontroller and development board due to its low cost, simple hardware design, and wide range of potential customers. Despite the development of numerous competitors, Arduino continues to enjoy widespread support among its thousands of devotees for several additional reasons.
1- Affordable
Contrary to other microcontroller architectures, Arduino’s hardware is significantly less expensive. To get your electronics projects started for less than $50, you can use ready to use Arduino boards. Even less expensive Arduino modules are also available. Additionally, you can get the Arduino IDE without charge.
2- Simple to Program
An off-the-shelf microcontroller can be difficult to program, and the code might be untidy, especially for beginners. Through the Arduino IDE, Arduino offers a straightforward and simple-to-understand coding environment. Removing the requirement for a separate programmer or burner, is especially helpful for students and individuals with limited experience with electronics projects. Due to its simple project user interface, no matter if you’re a pro or a seasoned progammer, Arduino will benefit you.
3- Cross-platform
Unlike other microcontrollers, that only operates with the Windows operating system, you can use Arduino with Windows, Linux, and MAC.
4- Large Code Libraries
Additionally, a sizable library of pre-loaded codes for the Arduino IDE is available for anyone to use, alter, or practice. Instead of starting from scratch, users can utilize these programs or change them for related applications. Because there are already codes to become familiar with and many tutorials from the Arduino community, learning is simpler for beginners with the different simple projects it offers. Professionals can save time by simply copying the pieces of code required for the projects from existing libraries, which is a huge time saver.
5- Free and Open Source Hardware and Software
Another significant benefit for users is that Arduino is open-source. Users can alter the design of the Arduino board and create their version because the design is open to the public. Even advanced users can create goods using an Arduino platform. To further comprehend the concept, beginners can lay it on a breadboard. When it comes to software, competent programmers can use C++ libraries to extend Arduino’s language.
Conclusion
To put it short, Arduino projects are good for beginners. It offers various simple projects that are quite catchy and easy. Since majority of its projects are easy, you can also look out for Arduino course if you stuck somewhere. Therefore, to save money and pique your curiosity, one recommendation is to buy components only once and make different projects with them.
