EasyEDA Arduino Pro Mini is a compact and versatile microcontroller board that is designed for use in a wide range of projects. It is based on the popular ATmega328P microcontroller and is compatible with the Arduino IDE, making it easy to program and use.
The board is small in size, measuring just 18mm x 33mm, but it packs a lot of power. It has 14 digital input/output pins, 8 analog inputs, and a 16 MHz quartz crystal, which makes it suitable for a wide range of applications. Additionally, it has a built-in voltage regulator, which allows it to be powered from a wide range of sources, including batteries, USB, and external power supplies.
One of the key features of the EasyEDA Arduino Pro Mini is its ease of use. It is designed to be simple to program and use, even for those who are new to microcontrollers. With its small size and versatility, it is an ideal choice for a wide range of projects, from robotics and automation to home automation and IoT applications.
Overview of EasyEDA
EasyEDA is a free, web-based tool that allows users to design and simulate electronic circuits. It has a user-friendly interface and a vast library of components, making it easy for beginners and professionals alike to create and test their designs.
One of the main advantages of EasyEDA is its integration with JLCPCB, a PCB manufacturing service. Once a design is complete, users can seamlessly transfer their design to JLCPCB for fabrication and assembly. This integration streamlines the process and saves time, making it an excellent choice for those looking to create their own PCBs.
EasyEDA also offers a community-driven platform, allowing users to share their designs, collaborate with others, and access a vast library of community-created components. This feature is useful for those who want to learn from others’ designs or share their own knowledge with the community.
Overall, EasyEDA is a powerful and easy-to-use tool for designing and simulating electronic circuits. Its integration with JLCPCB and community-driven platform make it an excellent choice for both beginners and professionals looking to create their own PCBs.
Overview of Arduino Pro Mini
The Arduino Pro Mini is a compact microcontroller board that is designed to be used in small projects that require a low profile and low power consumption. It is based on the ATmega328P microcontroller and is compatible with the Arduino IDE. The board has a small form factor of 18 x 33 mm and is available in 3.3V and 5V versions.
The Pro Mini has 14 digital input/output pins, 6 analog inputs, and a 16 MHz quartz crystal. It also has a reset button, an LED indicator, and a programming header. The board can be powered using a battery or an external power supply and has a voltage regulator that can handle up to 12V input.
The Pro Mini is a popular choice for projects that require a small form factor, such as wearable electronics, robotics, and remote control systems. It is also commonly used in DIY projects and educational settings due to its ease of use and low cost.
Overall, the Arduino Pro Mini is a versatile and reliable microcontroller board that is ideal for small projects that require low power consumption and a small form factor. Its compatibility with the Arduino IDE and large community of users make it a popular choice for hobbyists and professionals alike.
Using EasyEDA with Arduino Pro Mini

Creating a Schematic
EasyEDA is a user-friendly tool that can be used to create schematics. To create a schematic for an Arduino Pro Mini, start by opening EasyEDA and creating a new project. Next, select the “Schematic” option from the toolbar.
From here, you can add components to your schematic by selecting them from the “Libraries” tab. You can also search for components using the search bar. Once you have added all the necessary components, connect them using wires.
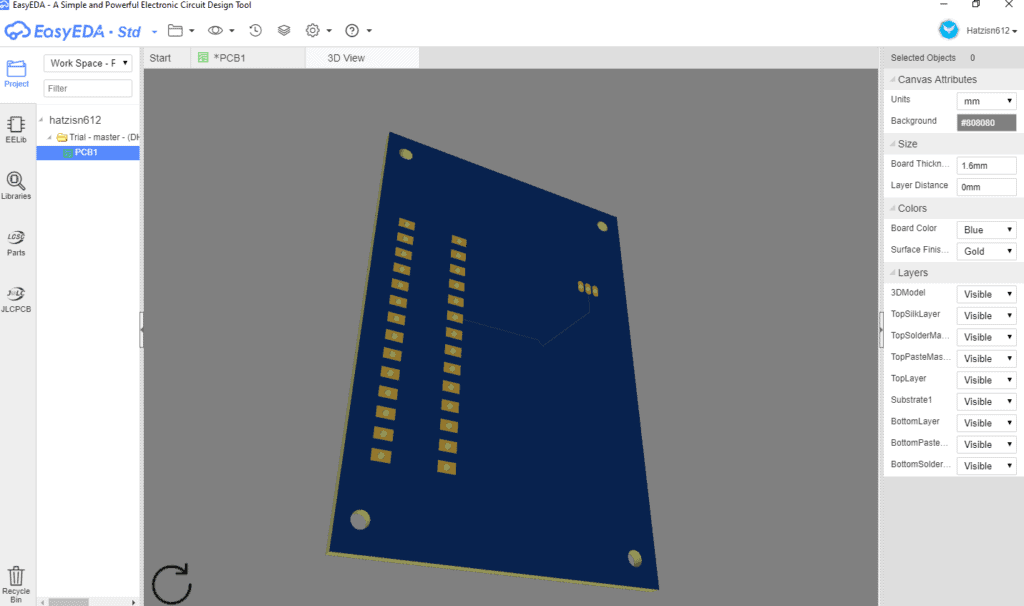
Designing a PCB Layout
After creating a schematic, you can design a PCB layout using EasyEDA. To do this, select the “PCB” option from the toolbar.
EasyEDA provides a range of tools to help you design your PCB layout. You can move components around, adjust their sizes, and connect them using traces. You can also add vias, pads, and holes as needed.
When designing your PCB layout, it’s important to keep in mind the size and shape of the Arduino Pro Mini. Make sure that your PCB layout is compatible with the Arduino Pro Mini before exporting your design.
Exporting Gerber Files
Once you have completed your schematic and PCB layout, you can export Gerber files from EasyEDA. Gerber files are used to manufacture PCBs.
To export Gerber files, select the “Gerber” option from the toolbar. EasyEDA will automatically generate Gerber files for your design. You can then use these files to order PCBs from a manufacturer.
In conclusion, EasyEDA is a great tool for creating schematics and PCB layouts for Arduino Pro Mini. By following these steps, you can create a design that is compatible with the Arduino Pro Mini and export Gerber files for manufacturing.
Programming Arduino Pro Mini with EasyEDA
Installing the Arduino IDE
Before programming the Arduino Pro Mini with EasyEDA, you need to install the Arduino IDE on your computer. Here are the steps to follow:
- Go to the official Arduino website and download the latest version of the Arduino IDE for your operating system.
- Run the installer and follow the prompts to complete the installation process.
- Once the installation is complete, open the Arduino IDE and navigate to the “Tools” menu.
- From the “Tools” menu, select “Board” and then “Arduino Pro or Pro Mini”.
- Choose the appropriate processor and port from the “Tools” menu.
Uploading Code to Arduino Pro Mini
After installing the Arduino IDE, you can now upload code to your Arduino Pro Mini. Here are the steps to follow:
- Connect your Arduino Pro Mini to your computer using a USB-to-serial converter.
- Open the Arduino IDE and create a new sketch or open an existing one.
- Write your code in the Arduino IDE and save it.
- From the “Tools” menu, select “Board” and then “Arduino Pro or Pro Mini”.
- Choose the appropriate processor and port from the “Tools” menu.
- Click the “Upload” button to upload your code to the Arduino Pro Mini.
That’s it! You have now successfully programmed your Arduino Pro Mini with EasyEDA.
