Upverter PCB is a powerful tool for designing printed circuit boards (PCBs). It is an online platform that allows users to create and collaborate on PCB designs in real-time. With its intuitive interface and comprehensive features, Upverter PCB is a popular choice for both beginners and experienced designers.
One of the key features of Upverter PCB is its ease of use. The platform is designed to be user-friendly, with a drag-and-drop interface that makes it easy to add components and connect them together. In addition, Upverter PCB includes a vast library of pre-built components, so users don’t have to start from scratch every time they design a new board. This makes it an ideal choice for beginners who are just getting started with PCB design.
Another advantage of Upverter PCB is its collaborative features. Users can work together on the same design in real-time, making it easy to share ideas and collaborate on complex projects. This makes it an ideal choice for teams who need to work together on a project, whether they are in the same office or spread out across the globe. Overall, Upverter PCB is a powerful tool that can help designers of all levels create high-quality PCB designs quickly and easily.
Overview
What is Upverter PCB?
Upverter PCB is a cloud-based printed circuit board (PCB) design software that allows you to create and collaborate on PCB designs with ease. It is a web-based application that eliminates the need for expensive software installations and hardware upgrades, making it accessible to anyone with an internet connection. Upverter PCB is designed to be user-friendly, with an intuitive interface that makes it easy for both beginners and experts to create high-quality PCB designs.
Key Features of Upverter PCB
Upverter PCB comes with a wide range of features that make it a popular choice among PCB designers. Some of the key features include:
-
Cloud-based: Upverter PCB is a cloud-based application, which means that all your designs are stored in the cloud and can be accessed from anywhere with an internet connection.
-
Easy Collaboration: Upverter PCB makes it easy to collaborate with other designers on your PCB designs. You can share your designs with others, and multiple users can work on the same design simultaneously.
-
Intuitive Interface: Upverter PCB has an intuitive interface that makes it easy to create and edit PCB designs. The interface is designed to be user-friendly, with drag-and-drop functionality and a variety of tools and features.
-
Real-time Design Rule Checking: Upverter PCB includes real-time design rule checking, which helps you identify and fix errors in your design as you work.
-
Library of Components: Upverter PCB comes with a library of over one million components, including symbols, footprints, and 3D models. This makes it easy to find and use the components you need in your designs.
Overall, Upverter PCB is a powerful and user-friendly PCB design software that is perfect for both beginners and experts. Its cloud-based nature and easy collaboration features make it an excellent choice for teams working on PCB designs together.
Getting Started

If you are new to Upverter PCB, getting started is easy and straightforward. In this section, we will guide you through the process of creating an account, navigating the dashboard, and creating a new project.
Creating an Account
To get started with Upverter PCB, you need to create an account. You can do this by visiting the Upverter PCB website and clicking on the “Sign Up” button. After entering your email address and a password, you will be asked to confirm your email address.
Once you have confirmed your email address, you can log in to your Upverter PCB account and start exploring the features and tools that are available to you.
Navigating the Dashboard
The Upverter PCB dashboard is the central hub where you can access all of your projects, tools, and settings. When you log in to your account, you will be taken to the dashboard.
From the dashboard, you can create a new project, access your existing projects, and collaborate with other users. You can also access the library, the design rules editor, and the parts search tool.
Creating a New Project
To create a new project, click on the “New Project” button on the dashboard. You will be prompted to enter a name for your project and select a project type.
Once you have created your project, you can start designing your PCB using the Upverter PCB editor. The editor is a powerful tool that allows you to create complex designs with ease.
In conclusion, getting started with Upverter PCB is easy and straightforward. By following the steps outlined in this section, you can create an account, navigate the dashboard, and start designing your PCB in no time.
Designing a PCB
When it comes to designing a printed circuit board (PCB), Upverter PCB is a great option. It offers a user-friendly interface and a range of features that make the design process easier and more efficient. Here are the three main steps involved in designing a PCB with Upverter PCB:
Schematic Capture
The first step in designing a PCB is to create a schematic. This is a diagram that shows the electrical connections between the components on the board. With Upverter PCB, you can create a schematic by selecting components from the built-in library and dragging them onto the canvas. You can then connect the components by drawing wires between them. Upverter PCB also offers features like net highlighting and cross-probing, which make it easy to navigate and edit your schematic.
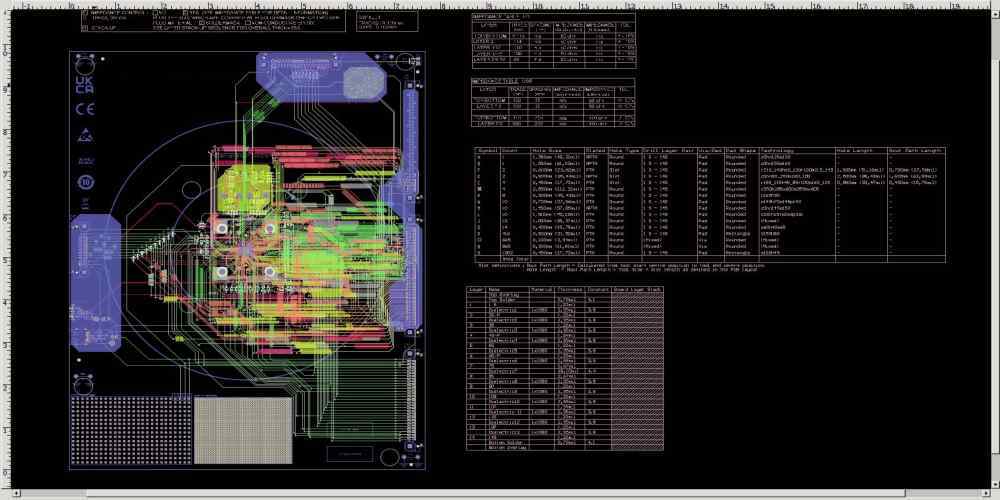
Layout Editor
Once you have created your schematic, the next step is to design the layout of your PCB. This involves placing the components on the board and routing the connections between them. With Upverter PCB’s Layout Editor, you can easily drag and drop components onto the board and move them around as needed. You can also use the autorouter to automatically route the connections between components, or manually route them yourself. Upverter PCB also offers features like design rule checking and 3D visualization, which help ensure that your design meets the necessary specifications.
Design Rule Checker
The final step in designing a PCB is to run a design rule check (DRC). This is a process that checks your design against a set of rules to ensure that it is manufacturable and meets the necessary specifications. With Upverter PCB, you can run a DRC at any time during the design process to catch any errors or issues before sending your design to be manufactured. Upverter PCB’s DRC tool checks for issues like incorrect clearances, missing connections, and incorrect pad sizes.
In conclusion, designing a PCB with Upverter PCB is a straightforward process that involves creating a schematic, designing the layout, and running a design rule check. With its user-friendly interface and range of features, Upverter PCB is a great option for anyone looking to design a high-quality PCB.
Collaboration

Upverter PCB offers a variety of collaboration tools that make it easy for teams to work together on projects. Here are some of the ways Upverter PCB enables collaboration:
Sharing Projects
With Upverter PCB, users can easily share their projects with others. This feature is useful for collaborating with team members or for sharing projects with clients. When sharing a project, users can choose whether to allow others to view, edit, or comment on the project.
Collaborating with Team Members
Upverter PCB also makes it easy for teams to collaborate on projects. Team members can be added to a project and given specific permissions, such as view-only or edit access. This allows team members to work on different aspects of a project simultaneously, without interfering with each other’s work.
In addition, Upverter PCB offers a real-time collaboration feature that allows team members to work together in real-time. This feature is especially useful for teams that are working remotely, as it allows team members to communicate and collaborate in real-time without having to be in the same physical location.
Overall, Upverter PCB offers a variety of collaboration tools that make it easy for teams to work together on projects. By using these tools, teams can work more efficiently and effectively, ultimately leading to better project outcomes.
Manufacturing
Exporting Gerber Files
Once you have completed your PCB design in Upverter, the next step is to export the Gerber files for manufacturing. Gerber files are the standard format used by PCB manufacturers to create the physical board. To export Gerber files in Upverter, follow these steps:
- Click on the “Manufacturing” tab in the top menu bar.
- Click on the “Gerber Files” option.
- Select the layers you want to export. Make sure to include all the necessary layers, such as copper, solder mask, and silk screen.
- Choose the units and resolution for your Gerber files.
- Click on the “Export” button to download the Gerber files.
Ordering PCBs
Once you have your Gerber files, you can order your PCBs from a manufacturer. Upverter makes it easy to order PCBs directly from the platform. Follow these steps to order PCBs:
- Click on the “Manufacturing” tab in the top menu bar.
- Click on the “Order PCBs” option.
- Select the manufacturer you want to use. Upverter has partnerships with several manufacturers, including JLCPCB and PCBWay.
- Upload your Gerber files and select the PCB specifications, such as board thickness, copper weight, and surface finish.
- Review your order and click on the “Order” button to submit your order.
It’s important to note that manufacturing and ordering PCBs can be a complex process, and there are many factors to consider, such as lead time, cost, and quality. Make sure to do your research and choose a reputable manufacturer that meets your specific needs.
Support
Upverter PCB offers a range of support options to help users get the most out of their experience. Here are the three main ways to access support:
Documentation
Upverter PCB provides comprehensive documentation to help users get started with the tool. The documentation covers everything from creating a new project to generating manufacturing files. It includes step-by-step instructions, screenshots, and videos to help users understand the process. The documentation is organized into sections, making it easy to find the information you need.
Community Forums
The Upverter PCB community forums are a great place to ask questions, get help, and connect with other users. The forums are active and moderated by Upverter PCB staff, ensuring that users get accurate and helpful answers. Users can search the forums for answers to common questions or post their own questions for the community to answer.
Contacting Support
If users need further assistance, they can contact Upverter PCB support directly. Upverter PCB offers email support, and users can expect a response within 24 hours. The support team is knowledgeable and helpful, and they can assist with a range of issues, from technical problems to billing questions.
In conclusion, Upverter PCB offers a range of support options to help users get the most out of their experience. From comprehensive documentation to an active community forum and direct support from the Upverter PCB team, users have access to the resources they need to succeed with the tool.
