With prototype PCB assembly, you are given the best chance of manufacturing high-quality printed circuit boards. How is this possible? With prototype assembly, you will be able to notice the errors before the manufacturing process takes effect. This cuts down the costs of manufacturing. This is one good reason why you should have a good understanding of Prototype PCB assembly.
This is why we have created this guide. It considers all the areas involved in PCB prototype assembly. After going through this guide, you should be well equipped and set to begin your PCB prototype assembly.
Prototype PCB Assembly: What does this mean?
Prototype PCB assembly refers to all the processes involved in the assembling of a PCB’s initial sample. This is the first thing that occurs before you go ahead with producing PCBs in bulk.
This is a very important process because it determines the specification and designs of the printed circuit boards. Also, through this process, you will be able to see the errors and make corrections before taking the mass production step.
This is what prototype PCB Assembly deals with. However, there’s a need to gain more knowledge on this topic. This is what we will be discussing in the chapters to come. Please continue reading.
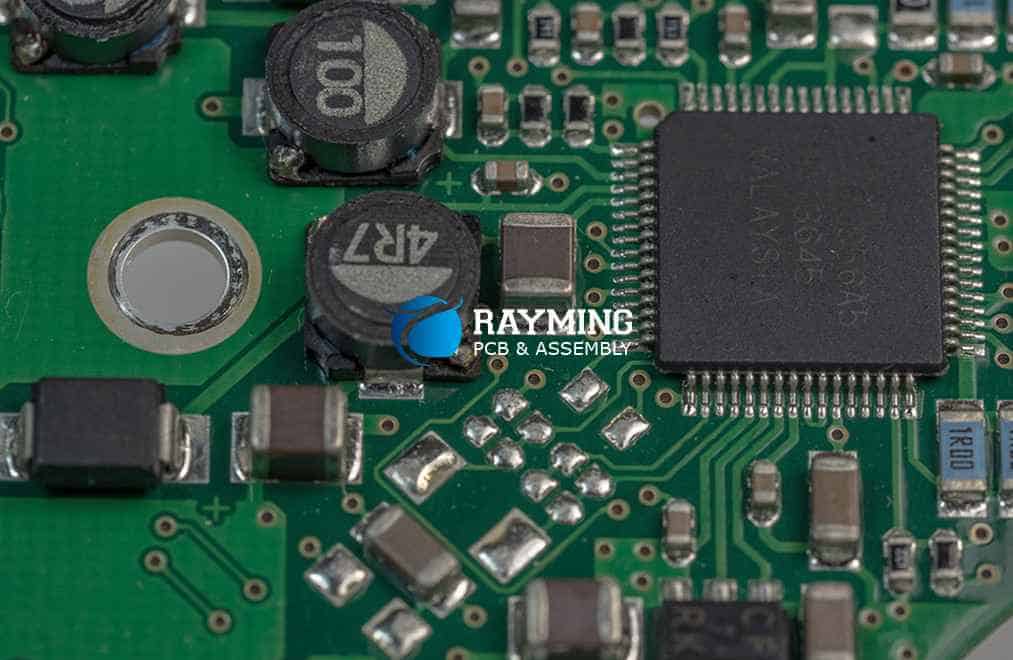
Basics of Prototype PCB Assembly
Before we begin, let us identify the important points regarding prototype PCB assembly. Having a good understanding of this will help in discussing prototype PCB.
Prototype PCB Assembly Advantages
Prototype PCB assembly comes with several advantages. These benefits play a major role in the facilitation of your PCB manufacturing. Some of these benefits include:
Detection of Flaws Early
With prototype PCB, you will easily detect whatever flaws are present during the product’s development stages. This will allow you to solve the issues thereby saving you some money if you had gone ahead to make the production having the flaws in them.
If you go ahead to make changes during the production, there may be a need for more technicalities, and this may be expensive.
Testing of Each Component
With a prototype, you will be able to test all your system’s elements individually before you go ahead to set it up. You should do this because it is important especially for very complex projects composed of several parts that are PCB based.
When you validate each of these fpga components, you will be able to identify those areas having issues that you should look into. This is the only way the project can function the right way.
Reduction in Total Costs
Utilizing the prototype bare PCB for any of your projects could go a long way in reducing what you’ll have spent in total for the project. With prototyping, you will be able to notice those errors in your project and then make corrections before you start the real production.
As soon as these flaws have been checked and rectified, then you may continue with the manufacturing of your Printed circuit boards in large quantities, thereby saving you unnecessary costs.
High-Quality PCBs
Why prototyping your PCB is important is to help you test if your project will function effectively. When we talk of testing, it involves the identification of errors present and then rectifying and making corrections to them.
Therefore, the eventual PCB after the prototyping will be of high quality that surely meets standards set internationally.
Less Turnaround Time
With prototype PCB assembly, you will be able to reduce the total time used in producing your printed circuit board. While making use of prototype printed circuit boards, you’ll be able to see the errors and then make corrections before you start the actual production.
Therefore, the eventual prototype will be free of defects. This implies that your PCBs will be produced quickly by your manufacturer.
Prototype PCB Assembly: Disadvantages
Regarding prototype PCB assembly, there are several limitations. Some of them include:
Expensive
The process of prototype PCB assembly doesn’t come cheap. It is expensive. This has to do with the material’s cost as well as the labor required for the fabrication of the prototype.
At this cost, this may have a negative effect on your final project, most especially if the amount you spent was higher than what you budgeted.
Take note that, after conducting the prototyping, there’s a need to begin again from scratch before you can continue with the fabrication of your PCB. This has to do with buying other materials that will surely increase the cost involved.
Consumes Time
The whole process of prototype PCB assembly is time-consuming. The prototype must be fabricated, tested, and the errors identified before going ahead with producing your PCB. Going through these processes will consume a lot of time.
This may cause some disruption to your initial schedule for production. This is why you need to place more emphasis on the time used. This must go in line with your schedule, most especially if this order is an urgent one.
Technical Specifications of the Prototype PCB Assembly
Before starting the process of the prototype PCB assembly, there are some specifications you should meet. Adhering to these specifications will make sure that your prototype printed circuit board functions perfectly. Now, let us consider these specifications.
Copper Details
One vital piece of information you must check is the copper weight on both your prototype’s outer and inner layers. Also, the PCB’s copper thickness tolerance must be checked as well.
Generally speaking, the weight of the copper for the prototype’s inner layer could fall between 0.5- 1.0 ounces. The outer layer could fall between 0 – 20 micrometers
Solder Mask
Anytime you are choosing your prototype PCB’s solder mask, there’s a need to make sure that it is right for prototyping. This solder mask is very important because it protects the solder bridges from short-circuiting. Here, you have every right to choose whatever color you prefer
Plating Type and Finishing
Prototype PCBs come with different finishes. Every finish has some benefits and pitfalls. However, there are some very common ones. These include immersion tin, OSP, immersion copper, and HASL. Other types include Gold and ENIG finishes.
Minimum Spacing of your Prototype PCB
This aspect is one of the most important when performing prototype PCB manufacturing and assembly. This minimum spacing has to do with that distance found in-between your prototype PCB’s traces.
This could also be traces’ width measurement on the printed circuit board. This minimum spacing is determined by some factors. These include the copper thickness and weight, and the board’s size.
Dimension of PCB Prototype
In order to reduce the total costs involved in the production, make sure that all the available spaces have been used. Another important point to note here is that your PCB manufacturing possess a regular and normal shape. This is because irregular shapes are known to cause space wastage.
Hole Size and Vias Type
This hole size is very important in the determination of the type and size of vial you wish to utilize. Vias are of three major types. These include buried vias, blind vias, and through-hole vias. Make sure that all the holes have a standard size through all the stages of PCB prototyping.
The Number of Layers
Some layers may come up on your prototype PCB. This depends on your final application. Take for example, your prototype PCB could possess between one to eight layers. What we mean is that the minimum number of layers a prototype PCB could have is one, while the maximum is eight.
Quality Grade of your Prototype
To make sure the user is safe, there’s a need to make sure that the quality grade of your prototype meets the standards of the ISO. Most prototypes usually come with the usual standard quality, which is IPC 1.
The quality may have some variations. This depends on whatever application you may select. However, all these variations have to work in line with the standards the authorities have put in place.
Material Type
This is very important because whatever material type you choose matters. This material must have the ability to hold whatever pressure is experienced by the prototype. Therefore, make sure your material meets the standards. Examples of top-quality materials that you may make use of include aluminum board, FR-4 board, and flexible board.
Amount of Prototypes
There may be so many prototypes in your application. This depends on the eventual product you create. For example, when handling projects that are complex, you may make use of other prototype printed circuit boards. They may function separately, but they will be operating as one unit.
But if simple products are involved, then you must have at least one prototype.
Thickness of Your Prototype PCB
Your prototype’s thickness has to do with your project’s complexity. Projects that are complex will need a board that is thicker. This will help the board tolerate some factors like high temperature. Take note that thickness of boards falling within 0.4 mm and 2.0 mm, will surely affect the prototype’s tolerance.
Capabilities of the Prototype PCB Assembly
The Capabilities of the prototype PCB assembly come in several different forms. All these forms come with its disadvantages and advantages, which you may have to analyze properly before choosing one.
To help you choose the best prototype PCB assembly form, let us consider these forms one after the other.
Through-Hole
Through-hole form of prototype PCB assembly deals with a printed circuit board having a metallic lead. It can also be wire-mounted to your printed circuit board. This is achieved by placing or attaching them using through-plated holes. The soldering process can go on, once you have been able to set the metallic lead or wire.
Here, the solder joints quality plays an important role. This is because they form the actual point of connection between your component and the board. There are several steps to follow in the preparation of the through-hole prototype.
Step 1: Pad and hole preparation
Remember that the lead needs to be placed through the hole ensuring that it is bent above the area for your pcb soldering, which helps in reducing solder and heat needs.
Step 2: Even application of heat to the lead, hole, and the pad
The major purpose of this is to assist the solder to stick to the two surfaces
Step 3: The solder should come in contact with the iron end
This turns the solder into liquid form. With this, it easily flows via the hole. As soon as this solder flows, a mound is formed on the board’s two sides.
Since you performed the lead soldering on the top area, there’s a need to check the bottom area, if the solder is enough. When enough solder clearance happens on the hole’s inner area, the solder is allowed to have an even flow via the board.
There are two major ways through which prototype assembly (through-hole) occurs. This is the automated and the manual type.
The automated prototype assembly makes use of machines all through the whole process involved in the production. The manual type needs the help of humans all through the whole process involved in the production.
Through-hole prototype PCB assembly features two major mounting components. This refers to the radial and Axial leads. Axial lead components deal with fitting the leads on the elements’ two ends. The radial lead component deals with placing the leads on just one of the component’s ends.
Making use of through-hole during the prototype pcb assembly process comes with some benefits.
Benefits of Through-hole Prototype PCB Assembly
It is easy to use
Due to the fact that the components can be replaced easily, it ensures that the process involved in testing the prototype comes easy.
It is reliable
You have nothing to worry about the through-hole prototype PCB assembly connections. This is because there is a strong link between the printed circuit board and the board itself.
It adapts to high heat
The through hole assembly comes with solders, which forms a very strong bond between the board and the components. With this, the prototype will possess a high tolerance for heat. This means that you will be able to test it in applications requiring high heat.
Disadvantages of Through-hole Prototype PCB Assembly
However, this also comes with several disadvantages. These include:
Long time period: Through-hole packaging usually consumes much time. Most times, you will need to place the components in a manual way before you solder. This takes a lot of time. This could end up having an effect on the production schedule generally.
Space: Through-hole, compared to the surface mounting, usually requires much space to ensure that the components are soldered properly. This may become a problem, most especially when the printed circuit board or application size is small.
Speed: The speed of operation of the prototype printed circuit boards assembled beneath will work at lesser speed
Cost: The price overall for performing prototype PCB assembly is much higher. This is due to hole drilling, as well as the soldering process that comes after.
Surface Mount
This form of mounting doesn’t require holes drilling on the pcb board. Rather, the components feature surface mounts, which are made up of leads either below or around them.
These leads help in making the connection with whatever pads are found on the printed circuit board. On your empty pads, you will have to place your solder paste. The next thing after you have set the required elements on your pad is to move them to the reflow oven. This is where the soldering will occur on the printed circuit board.
You’ll discover some SMD packages available on the market. This depends on the material, as well as the shape. However, three groups of packages are available here. These include:
- The rectangular passive components – this has to do with standard resistors and capacitors
- Small Outline Diode and Small Outline Transistor – for diodes
- Small Outline Transistor – for transistors
- The last category is majorly for ICs – Integrated Circuits like microcontroller and transceivers.
The surface mount type comes with its benefits as well as pitfalls. Its major advantages are:
Benefits of Surface Mount Prototype PCB Assembly
Space utilization: With surface mounting, the space is maximally utilized. You can achieve this because those SMD components can be placed on the board’s sides.
Increase in the density of the board: Because SMD components usually have a small size means that the board’s overall density can be increased. This contrasts the through-hole type of prototype pcb assembly.
Cost: This should be the most important benefit associated with the prototype pcb assembly via surface mounting. Remember that there’s no need to worry about holes drilling. Later on, you will be able to cut down the total cost of production.
Saves Time: Making use of the Pick & Place machine goes a long way in reducing the time involved in producing the prototype printed circuit board. Another great effect here is that you’ll be guaranteed quick deliveries.
Limitations of Surface Mount Prototype PCB Assembly
Surface mounting also comes with some limitations. The power you can place on these prototypes are limited. This is because the SMD cannot adapt to applications requiring high power. If you have small circuits and you wish to perform prototype pcb assembly, then you shouldn’t go for surface mounting because it will not be the most appropriate option you can use. This is because it is not compatible.
Mixed
This is the mixed type of prototype pcb assembly. This talks about the technology combining the earlier types of mounting which we have discussed: the through-hole and the surface mount.
It is very important that you create a special sequence of arrangements for the board. This is because it dictates what areas you should drill holes into and those areas you should not.
The Mixed prototype is available in different forms. Let’s consider them:
Single side Mixed
The assembly process of this form has to do with the procedures outlined below. The first thing to do is the printing of the solder paste. After this is the placement of the SMD parts. After this, you’ll then go ahead with the reflow soldering.
Next is the placement of the hole component. Last, is the wave soldering. Asides from wave soldering, hand soldering can also be used if your through-hole quantities are small
A side Through-hole and a side SMT technology
This assembling procedure has to do with the following. The first thing here is the adhesive of the surface mount. You then go ahead with the placement of SMD parts. After this, is the solidification stage.
The next step is the board flipping, followed by the placement of the through-hole component. After this, the wave soldering can go on.
Note that this form is not ideal to use. This is because the adhesive will cause a burden on the total cost involved in the assembly of the prototype PCB. There may be soldering issues as well.
Double Sided Mixed Prototype Assembly
Two options are involved in this form. Prototype PCB having adhesive and that having no adhesive. That having adhesive raises the prototype PCB assembly cost. This form’s procedure is as follows:
First is the printing of the solder paste. After this is the placement of the SMD parts. Then the next is reflow soldering. After this, flip the board and then apply the SMT adhesive. Next, place the SMD parts and then solidify them.
You then flip the board. Next is the placement of the through-hole component. You then go ahead with wave soldering.
Conclusion
After going through this article, you should be a professional in prototype PCB assembly. With this knowledge, you can go ahead with any PCB prototyping. However, make sure that you pay good attention to the considerations and the specifications before you go ahead with the fabrication. Another important point here is that you must choose the appropriate material and then work with the fabrication procedure in order to get high-quality prototype PCB. You may also need a good and reliable manufacturer in case you don’t know what to do. You can always contact us for any issues associated with prototype PCB assembly. We surely will be there for you.
